

So ok, let's start the discussion. In the last blog I told you how to make 3D Render in Etabs. You might have got some knowledge about it. And if you have not seen that blog than you can have a look at it. You can also click here to see that blog. You might get some knowledge about it.
Ok so I am going to tell you about making Skyscraper in Etabs software. But first of all you have to know the basic ideas of making a building design in Etabs software. Such as beam design, column design, slab design etc. and also some other designs which are quite related to building structure. And if you does not have knowledge about this then you can click here to get a little bit of knowledge about it.
So ok, this discussion is only for the intermediates who have little knowledge about building structures in Etabs software. And for the beginners you can click on the above link. So those who know how to make building design in Etabs or Staad-Pro software, you can also have the knowledge of making about 10 stories or even more than that. So this skyscraper design is also like that. It is quite similar to that.
First of all open the Etabs software and you make the settings. You know how to do this. After come to the Grid systems data and from here the main step begins. So you no need to come to the "Custom Grid Spacing", you come to the "Uniform Grid Spacing". Now in Grid Spacing, Number of Grid in X or Y direction gives according to your choice; as well as spacing also in your choice. And in story data, give number of stories more than 30. I have given 40. You can also give as you want (but more than 30) as well as for story height also give top height as 3 and for bottom as 4. You can look at the image.


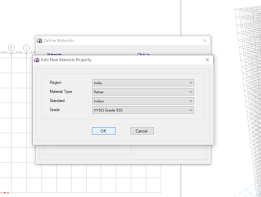
As you all know that after the plan view or 3D View originates on the screen next step is to define materials as well the section properties. But here is a little twist, Wait! don't get afraid, it's not twist it's change. You know we should have to go "Add New Property". After clicking on that Region, Material Type, Standard will be same but on grade give M40 or even more. As well as for rebar also you give high grade i.e. HYSD 550 or even more. But why have I told you to give high grade you know it well, because it's a skyscraper and high strength of material is needed. Oh! I forgot to tell, click on the OK button. Well however you know that 😀😍.

After making all these, now it's time to define the sections. You can give your dimensions as you want. But according to my choice give beam section as 300 X 400mm, column section as 400 X 500mm, slab thickness as 150mm. And click on the OK button. After that you no need to click on "All Stories". It's a skyscraper and all stories will make whole structure as same length and same width. So today you click on one story only and i.e., Story1. And after that you know, how to make beams, columns, slabs and all that. You make it on one story only.

So now, now what to do. Press the esc key, and select the whole plan. Wait, no need to select the whole structure, you drag your mouse cursor and select the whole plan only. After that go to Edit menu and select Replicate option or press Ctrl+R. After that a dialog box appears with four tabs and first tab appears as Linear. You click on the Story tab. After that you select the story upto which you want to copy. But it should not be more than 10 stories. Since the column, beams and slabs are placed in story1 so you drag you mouse and select from story2 to story 10. After that click on Apply button and then on OK button. You can see in 3D View also, how the structure appears.


Ok, 1st step is over. Now what to do after that. So with the help of Move up & Move down arrow tools, you click the Move up tool and come to the story11. And you know where it is found as I have told you before this is for intermediates. Now, since it's a skyscraper so continuous long columns will make the building collapse. So there is upto some limit where you can make it. And we all know at more height or above more wind passes. So you should also have to design the building with respect to the wind as well w.r.t. the column height.
So in story11 you give 3 grid spacing, you can give 1 grid spacing also but this should be at the front side. But I have given 3 grid spacing so that the building becomes more stable with less column heights. But remember it should be one story and after that you make those beams, columns & slabs etc. After that the same process follows. Drag and select the whole plan and go to the Edit menu, click on Replicate option. And now you select from story12 to story 20. Drag your mouse to select it. After that click on Apply button and then on OK button. You can see your structure in 3D-View.

Again the same step continues. With the help of Move up button come to story21 and drag your mouse to select the beams, columns, slabs etc. But wait before doing that remember one one thing, Grid Spacing. Grid spacing is important and leave one grid spacing from the previous you have made. No one will make long columns at the last side of the building. You make it in the inner side or by leaving 1 or 2 grid spacings. (The place where you make beams are known as grids in Etabs).

So after you make all those beams, columns and slabs you select the whole plan and then go to the Edit menu, select Replicate option and then in the story tab drag your mouse from story22 to story30. After that click on Apply button and then on OK button. The required structure appears in 3D-View.


So now your whole whole structure is ready. So it's time for modelling/ Rendering. So how you will do that. As I have told you in the previous blog that a tick ☑symbol appears (set Display Options) in the ribbon button, you can click their and a dialog box appears. In the dialog box on General tab, and then in Special Effects check "Extrude Frames" & "Extrude Shells". After that check Apply to All Windows and then on Apply button and then on OK button. And if you don't know how to do it then see my previous blog. You can see the required structure in 3D-View also.


Facebook:- https://www.facebook.com/groups/904035093755577
Instagram:- https://www.instagram.com/abhijit.patowary.33/
Comments
Post a Comment
Please do not enter any spam comment.