Well I have been gone through with all those AutoCAD, Revit architecture, Google SketchUp etc. with all these software. Now I am learning 3DS Max for building architecture and 3D realistic designs. All those Revit and SketchUp doesn't seem amazing for me. It's only just make the design, give 3D elevation, and after that render it. It's like quite simple. So I have been going through with 3DS Max designs, although it's very complex to make, but it seems quite interesting. You have to make the designs part by part and gives nice view while making, then imagine how it will look like after rendering.
.png)
.png)
So I have been learning now these designs, and it gives me an enormous thinking. I only just try to know how to make these designs fast. For a 10-15 minutes video, it takes me 2-3 hours to make a simple design. Then for 1-2 hrs video just think. How fastly I would have to build up my skills. But I have not found this complexity in Revit. The way I have learnt the designs, it's quite simple to solve it. I was quick enough, although it's very simple to make those designs.
But for 3DS Max you have to be smart enough. Likely, it's very much interesting and complex also. But it works your brain smartly and fastly. And how to import AutoCAD file in 3DS Max, I will teach you now.
.png) |
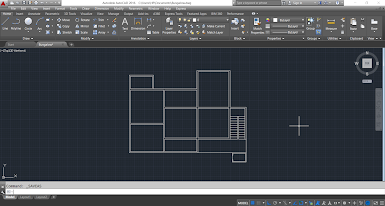
| Make this drawing on AutoCAD |
So first you make a drawing in AutoCAD, and after that save the file. You all know that. But now for importing that AutoCAD file in 3DS Max you follow the following procedure :-
- Open 3DS Max software and after that close the unwanted file.
- First make the unit setup by clicking on the Customize tab and set the units. But be sure, the units should be given preceding the units you have given in the AutoCAD file.
- After that go to file menu and you will see an option Import in that tab. Click on that.
- After that a dialog box appears. In the Attach tab you click on Attach this file option.
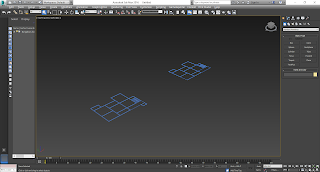
- The AutoCAD drawing appears, as you can see below.
.png) |
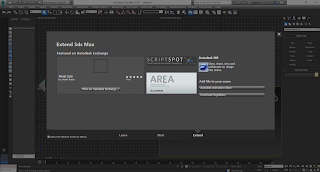
| Close this unwanted dialog box, by clicking on the cross button |
.png) |
| Click on customize tab, then make the unit set-up and after that go to file tab. In the file tab you click on Import option -> select the drawing you have saved it. After that click on Open and then this dialog box appears on your screen. |
.png) |
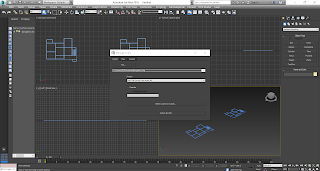
| This is the required drawing that appears on your screen. |
Maybe you have understood the procedure or may-be not. But if you read once again you will get it too. But have you noticed one thing, the AutoCAD file you imported in 3DS Max appears blue in color. It seems awkward, or might not you would not see it distinctly. (For image it's different, it looks awesome 😅) So to make it distinct and proper color you have to make it white. For black screen white only seems to be perfect. So to make this you have to follow the following steps :-
- Click on the 4th screen perspective (realistic).
- Then press on the keyboard Alt+W to view the screen larger and in full size.
- After that on the right side bar, name and color you can see a color box their.
- Click on that color box and a dialog box appears. Click on the color that you like to see yor lines clear and distinct.
- After that click on OK and the dialog box will automatically close.
You can see at the images here.
.png) |
| Click Alt+W to appear you screen a bit larger |
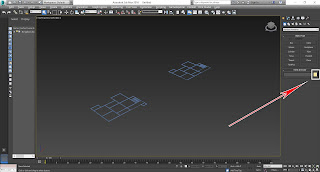.jpg) |
| After that go to the sidebar dialog box, where Name and Color is written. Click on the color box and choose your own color. |
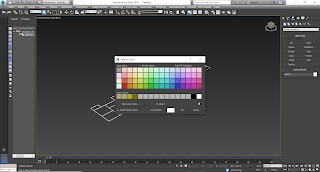.png) |
| For me White color is most suitable, so I clicked on that. You also choose your own color. And then click on OK button. |
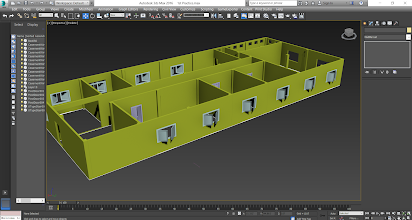
So now, now what to do? You click on Box button, create walls and floors and then subtract the doors, windows, ventilators etc. and after that make it. Your house will be ready. For more ideas go to You Tube, click there and watch the videos'. Theoretically explaining and practically understanding is huge difference. You learn to create walls, columns, doors, windows by seeing the You Tube videos'. And after that you can make the design like me.
And there are lots of more need to make such as placing furniture's, giving colors, making realistic view more glorious etc. and more. All those things I will explain you in the next blog.
.png)
.png)
.png)
.png)
.png)
.png)
.png)
.jpg)
.png)
.png)
.png)
.png)
Comments
Post a Comment
Please do not enter any spam comment.