In the last blog I had described about making beams, columns, slabs/roofs in Etabs. But I forgot to tell you how to make staircase. Apology for that. But today in this blog I am going to discuss how to make staircase in Etabs. So before making Staircase first of all delete one side of the slab by single click. But remember one thing in the story side you should have to click "All Stories" so that automatically all slabs will get deleted and required gap and positioning will be appeared.
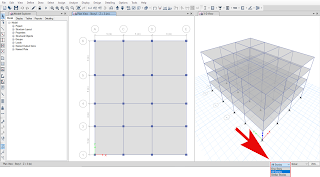 |
| First click on All Stories |
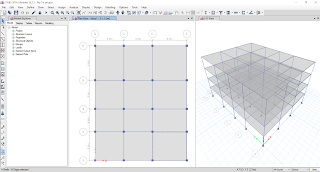 |
| After that select one portion of slab |
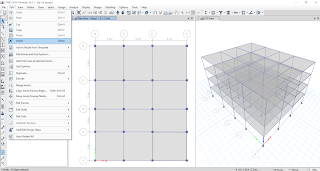 |
| After that go to Edit menu and click on Delete |
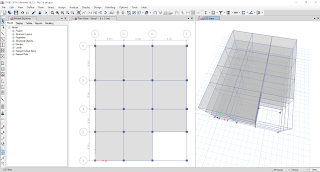 |
| Then one part of the slab of each story becomes hollow |
So doing the following steps you can now make the staircase. As for staircase we need hollow section at the top of it, so that it's free to move. In practical field also you can't provide staircase if the roof is covered with slab. Now the main procedure begins for Etabs.
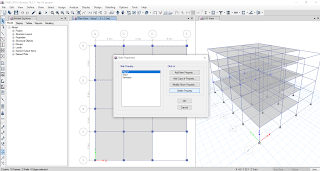
Go to define tab menu and click on Section Properties. After that click on Slab Section. A dialog box will appear on the screen and click on "Add New Property". After that another new dialog box appears and in their you can see that in general data give attention in two things, i.e., in Property Name type Staircase and in Slab Material by clicking on dropdown button give HYSD415 steel grade. I will tell you later why I had given you so. But now focus on your work. After that in Property Data in Type click on Slab and in Thickness type 125mm. Because for staircase or landing thickness is 125mm only. After that click on OK button.
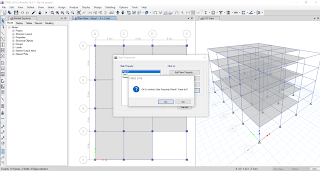
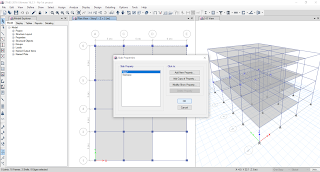
Now in the dialog box you can see some additional names are also there. This is given in default. That means it's name given by Etabs only. You may delete it or may not also. Ok but for those who want to delete it click on the name that you want to delete and after that there is a option Delete Property. Click on that, then Yes and after that click on OK button.
 |
| Click the required button and click on Delete Property |
 |
| Click on Yes |
 |
| Click on OK button. |
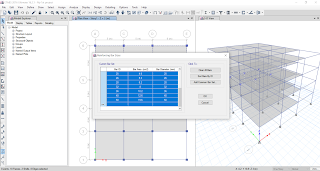
After that again go to Define, click on Section Properties, click on Reinforcing Bar Sizes. A new dialog box will appear on the screen and click on 6, 10, 14, 20 and continue dragging on and select upto end. After that delete the selected items and keep the reinforcing of 8, 12, 16 bars. Because mainly these types of bars are used at the site. And these types of bars are designed on Etabs. Click on OK button.
Now come to the Plan View title bar, right click and select Add/Modify grids.. A dialog box appears on the screen and then click on Show/Modify Grid System... Now in the top right side you can see Reference Points and Reference Planes. Click on Reference Planes option bar. After that a dialog box appears and click on Add button. Give the height where you want the reference plane to be. But by default Etabs takes the distance from Footing only. So if you want to take my option you give the distance 3+1.5=4.5m. After that click on OK button. You check it by yourself at what distance the Reference plan will set the best but this is possibly ok.
Sorry I could not take a photograph of that dialog box where you should have to give the distance. Apology for that, but you will get to know as you practice it. Ok whatever be, now the reference plane occurs on your screen.In the plan view you see as RefPl...... wait I will show you the pic. After that go to left border and select Draw Beam tool and draw the beam where you want. After that go to the Draw menu and from there select the Draw Reference Points option.

Now after selecting Reference Points what you will do 😛. Select the X-axis or Y-axis and give the distance as per your requirement. If its left side on X-axis give a -ve sign and if it at right side give +ve sign. Similarly if its up side of Y-axis give +ve sign and if its down side of Y-axis give -ve sign. But the value should be given by you as per your requirement. But how to draw those staircase I will give you the link, you can see from that and learn it. You Tube is for practice but seeing article is just some steps to remember. So practice from You Tube and if you forget some steps just come and have a look at article. You can
click here to know the drawing of staircase. If I will explain about these then your mind will mis-match and you will understand nothing. You can also look some images how I made it.
So after completing all the steps of making staircase, you select beam and landing and then go to the Edit menu tab, from their click Replicate. A dialog box appears on the screen and select how many stories you want to copy it or in which floor you want to copy. You have also got the idea by those You Tube videos. So you practice it and if you forget anything just come here and see it again for quick revision 😍.


Comments
Post a Comment
Please do not enter any spam comment.